How to Make a DIY Air Filter for Your Craft Room or She Shed
Do you find yourself constantly battling dust in your craft room or she shed? Whether you’re painting, sewing, or working on DIY projects, dust can quickly take over your space—and your lungs! Store-bought air purifiers can be expensive, but there’s a better solution: a DIY air filter that’s easy to make, budget-friendly, and incredibly effective.
In this post, I’ll walk you through the steps to create your own DIY air filter using simple materials. Not only will this keep your workspace cleaner, but it’ll also help you breathe easier while you create. Let’s get started!
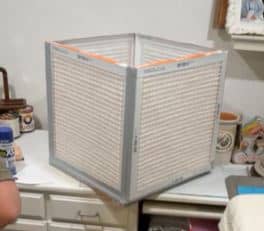
My first filter was a cube filter that you’ll find at the bottom of this post!

This post may include affiliate links; you can read my disclosure policy here.
Why You Need an Air Filter in Your Craft Room
Dust isn’t just annoying—it can also affect your health and the quality of your projects. Here’s why an air filter is a must-have for your craft room or she shed:
- Health Benefits: Reduce allergens, dust mites, and airborne particles that can irritate your lungs.
- Cleaner Projects: Keep dust from settling on your materials, fabrics, or finished pieces.
- Cost-Effective: A DIY air filter costs a fraction of the price of a store-bought purifier.
Materials You’ll Need
Here’s what you’ll need to build your DIY air filter:
- A 20-inch box fan (like the ones you can find at hardware stores)
- A 20x20x1-inch MERV 13 air filter (MERV 13 is ideal for capturing dust and small particles)
- Duct tape to secure the filter
- Optional: A second air filter for increased efficiency (double these supplies if your room is large and make two filters)
Step-by-Step Instructions to Build Your DIY Air Filter
Building your air filter is quick and easy. Follow these steps:
- Set Up Your Fan: Place the box fan on a flat surface, ensuring it’s unplugged.
- Attach the Filter: Position the air filter against the back of the fan (the side where air is pulled in). Make sure the arrow on the filter points toward the fan.
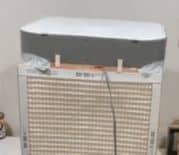
- Secure the Filter: Use duct tape or bungee cords to tightly secure the filter to the fan. If you’re making a cube filter using five filters, tape them to the each other in a cube shape and then tape that to the sides of the fan to create the cube shape.
- Plug It In: Once everything is secure, plug in the fan and turn it on.
That’s it! Your DIY air filter is ready to clean the air in your craft room or she shed.
Shop the supplies
Tips for Maintaining Your DIY Air Filter
To keep your air filter running efficiently:
- Replace the Filter: Swap out the filter every 3–6 months, depending on usage.
- Clean the Fan: Wipe down the fan blades regularly to prevent dust buildup.
- Position It Strategically: Place the fan blowing out a window or door for maximum airflow.
Why This DIY Solution Beats Store-Bought Filters
- Affordable: A DIY air filter costs less than a store-bought purifier.
- Customizable: You can use multiple filters for higher efficiency or adjust the fan speed as needed.
- Eco-Friendly: Replacing just the filter reduces waste compared to replacing an entire unit.
FAQs About DIY Air Filters
Q: How often should I replace the filter?
A: Replace the filter every 3–6 months, or sooner if you notice reduced airflow.
Q: Can I use this for larger spaces?
A: While this works best for small to medium-sized rooms, you can use multiple fan filters for larger areas.
Q: Is this safe for pets or children?
A: Yes! Just make sure the fan is stable and out of reach of curious hands or paws.
My Real Life Thoughts
A clean, dust-free workspace is essential for creativity and comfort. With this DIY air filter, you can enjoy a healthier, cleaner craft room or she shed without breaking the bank. Give it a try and see the difference it makes!
Have you built your own DIY air filter? Share your experience in the comments below! And if you’re looking for more she shed or craft room inspiration, check out my post on [10 Must-Have She Shed Accessories].
I had a paint studio for many years and I wish now that I had thought of this then. It wouldn’t have cut 100% of the dust, but it would have helped… A LOT!
These days I still paint but I spray less than I used to. I still need my brushed pieces to be free of dust.
Tip: If you mix resin you will want a powerful filter, but if you need dust free quality air you can use a normal HVAC filter.
How To Create A DIY Cubed Air Filter


- Point arrows toward each other.
Make sure that you follow the arrows on your air filters to make sure that the air being pulled in is filtering through in the right directions. There are arrows on your filter that should all point inward toward each other to form a cube.
- Tape filters together.
Duct tape your first two filters together, then three, then four completely sealing the entire strip from top to bottom
- Add filter to the bottom.
You can tape a filter to the bottom as well. If your filter will need to move around the room I suggest adding a filter to the bottom or you can use cardboard cut to 20×20 and tape it to the bottom as well. The point is to filter as much air as possible through the filters so the bottom needs to be sealed or the dust that flows in will just go right back out through the fan.
- Placement of fan.
Place your fan, blowing direction out of the cube and into the room, on the top of your cube and be sure to put the cord running out and not trapped inside the cube. Not that I did that or anything, but I totally did that the first time!
- Sealing the fan.
Duct tape the entire way around the fan sealing it completely
- Voila!
Your new air filter is complete!
I think this is genius! Who doesn’t want and need cleaner air! Thanks for sharing this project.
Well it was necessary for my little space and keeping the dust down! Thank you Kim!
Love this idea Amy! I’ve never thought of this. I’m sharing it with my readers in this weekend’s newsletter.